A Complete Guide to Outdoor Window Blinds Installation
Transforming your patio, balcony, or garden room into a year-round sanctuary often begins with the right shading. Outdoor window blinds (often called external rollers or patio screens) are a brilliant investment for Adelaide homeowners looking to manage heat gain and privacy.
While outdoor blinds can be installed as a DIY project, many homeowners prefer professional installation to ensure long-term durability—especially in windy areas like Adelaide.
Here is your comprehensive guide to getting it right the first time.
1. Preparation and Tools
Before you climb the ladder, ensure you have everything required. Unlike indoor blinds, outdoor versions deal with wind and rain, meaning secure fixings are non-negotiable.
Essential Kit List:
- Power Drill & Masonry Bits: For drilling into brick or stone.
- Spirit Level: Essential for ensuring the casing is perfectly horizontal.
- Metal Tape Measure: Accuracy is vital; do not use a fabric tape.
- Pencil: For marking drill holes.
- Stainless Steel Screws & Wall Plugs: Ensure these are weather-resistant to prevent rust streaks on your masonry.
- A Sturdy Ladder: Always have a second person to spot you.
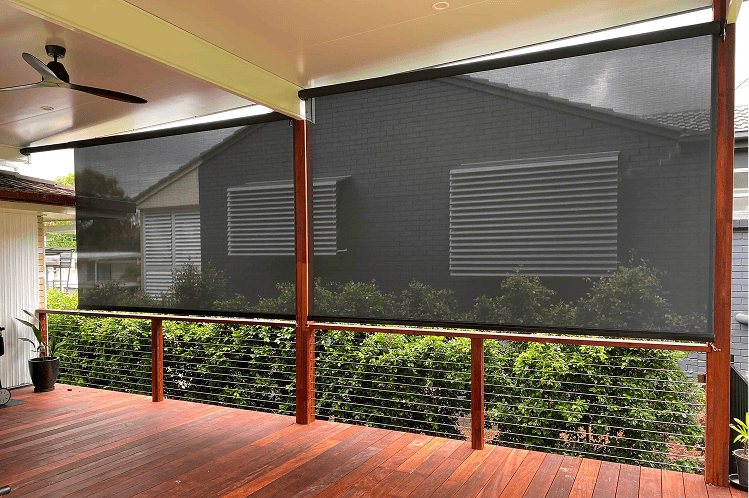
2. Choosing Your Mounting Style
There are two primary ways to fix your blinds. Your choice depends on the architecture of your window or opening.
| Mounting Type | Description | Best For |
|---|---|---|
| Recess Fit | The blind is fitted inside the window reveal (the “hole” in the wall). | A sleek, flush look and maximum wind resistance. |
| Face Fix | The blind is mounted onto the outer face of the wall, overlapping the opening. | Windows with shallow sills or where you want to cover the entire frame. |
3. Step-by-Step Installation Process
A: Precise Marking
Hold your mounting brackets up to the desired position. Use your spirit level to ensure they are perfectly aligned. If the brackets are even slightly tilted, the fabric will “telescope” (roll to one side), which can fray the edges over time. Mark the screw holes clearly with your pencil.
B: Drilling and Plugging
If you are fixing into brick, avoid drilling into the mortar joints if possible, as these are weaker than the brick itself.
- Drill your holes to the depth of your wall plugs.
- Insert the plugs so they sit flush with the wall surface.
C: Securing the Brackets
Screw the brackets into place. If you are installing a heavy motorised blind, ensure the fixings are “heavy-duty” to manage the weight and the torque of the motor.
Step D: Mounting the Blind
With the help of a second person, lift the blind cassette (the top housing) and click or screw it into the brackets. Most outdoor blinds use a “hook and lock” system. Listen for the click to ensure it is seated safely.
Step E: Installing Side Channels or Guide Cables
Most outdoor blinds feature side channels or wire guides to stop the fabric from flapping in Adelaide (Australia).
- Extend the blind halfway down to align the guides.
- Fix the base of the cables or the tracks to the wall or floor.
- Ensure the tension is tight; a loose blind is a noisy blind.
Step 4: Taming the Wind
In Adelaide, a “calm day” is a rare treat. Most outdoor blinds come with side channels or guide wires to stop them from acting like a sail.
- Drop the blind about halfway down.
- Align your side guides so they’re perfectly vertical.
- Fix them at the bottom, making sure the tension is tight.
If there’s too much slack, the blind will slap against the wall all night, and your neighbours won’t thank you for it.
Long-term Care:
- Clean the Tracks: Every six months, wipe the side channels with a damp cloth to remove grit and debris.
- Dry Before Retracting: If the blinds are soaking wet, try to let them dry before rolling them back into the cassette to prevent mould growth.
- Lubricate: Use a dry silicone spray on moving parts once a year to keep the operation silent.
A Bit of Common Sense
Even the best-fitted blinds have their limits. If the start issuing weather warnings or you see the trees bending in the wind, pull the blinds up. No matter how well you’ve bolted them in, Mother Nature usually wins that fight.
The Golden Rule: If the fabric gets a soaking during a downpour, try to leave it down until it dries out before rolling it back into the box. Rolling up wet fabric is a surefire way to end up with a musty, mouldy mess by next summer.
Take your time, keep it level, and you’ll have a professional-looking setup without the professional price tag.